Sauces & Condiments
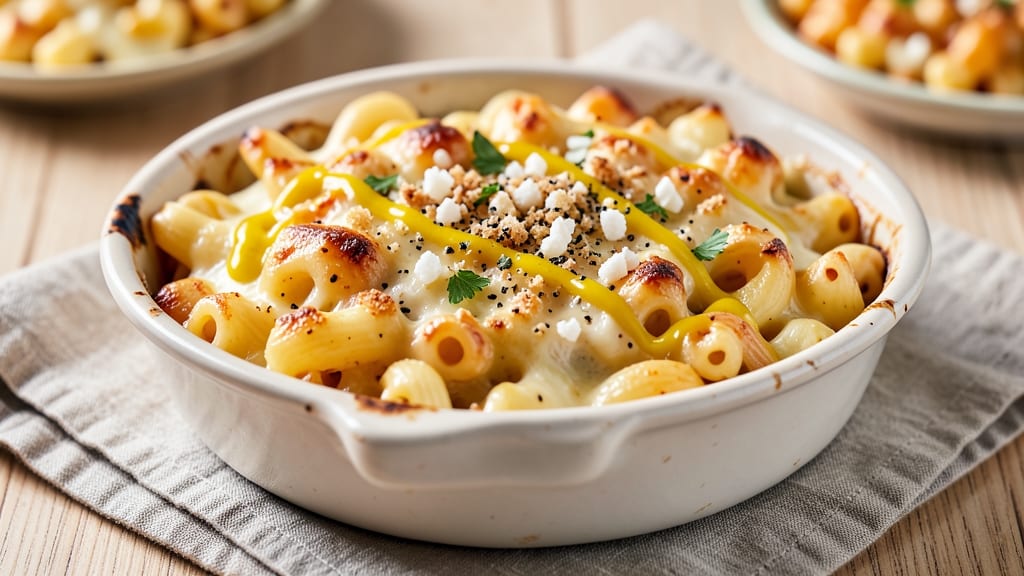
This bake macaroni sauce recipe delivers the comforting, golden perfection of a classic casserole—creamy sauce bubbling over tender pasta, all in one foolproof oven dish. The secret lies in a rich, velvety sauce that clings to every noodle while the top develops that signature crackly crust.
I perfected this version after years of testing, ensuring the pasta stays al dente while the sauce achieves that signature ultra-creamy texture without breaking.
What sets this recipe apart is the balance: a simple approach that yields restaurant-quality results with minimal effort. You'll start with elbow macaroni cooked just until al dente, then combine it with a velvety cheese sauce featuring sharp cheddar, cream cheese, and a touch of mustard for depth.
The sauce is thickened just enough to coat the pasta perfectly without becoming gluey, while the breadcrumb topping adds a satisfying crunch.
By the time it emerges from the oven, you'll have a dish that's comforting yet elegant—golden bubbles of sauce, tender pasta, and a crispy top that begs to be broken.
The aroma alone transforms any kitchen into a cozy dining experience. This recipe scales beautifully for family dinners or meal prep, making it a weeknight staple that always delivers.
Serve it as-is for a classic comfort meal, or add protein like ground beef, chicken, or Italian sausage for extra heartiness. The possibilities are endless, but the foundation remains the same: creamy, satisfying, and impossible to resist. Let's get started on this bubble-top magic.
Ingredients for bake macaroni sauce
Here's what you'll need for this ultra-creamy, bubble-top bake macaroni—simple ingredients that deliver restaurant-quality comfort.
| Ingredient | Amount | Notes |
|---|---|---|
| Elbow Macaroni 🍝 | 1 ½ lbs | Cooked al dente, drained |
| Sharp Cheddar Cheese 🧀 | 2 cups | Shredded, block preferred |
| Cream Cheese 🧈 | 8 oz | Full-fat, room temperature |
| Heavy Whipping Cream 🥛 | 1 cup | Full-fat for richness |
| Dijon Mustard 🍯 | 1 tbsp | For depth of flavor |
| All-Purpose Flour 🌾 | ¼ cup | For thickening sauce |
| Parmesan Cheese 🧀 | ½ cup | Freshly grated, for topping |
| Panko Breadcrumbs 🍞 | ½ cup | For crispy topping |
| Butter 🧈 | ¼ cup | Melted, for breadcrumbs |
| Garlic Powder 🧄 | 1 tsp | For subtle garlic flavor |
| Ground Black Pepper 🌶️ | ½ tsp | Freshly ground preferred |
| Salt 🧂 | 1 ½ tsp | Kosher or sea salt |
| Milk 🥛 | ¼ cup | For creaminess adjustment |
The cheddar makes or breaks this dish. Block cheese is non-negotiable—pre-shredded gets clumpy and lacks that signature melt. I always grab Kraft sharp cheddar from the deli section at Kroger or Wegmans—it's consistent and affordable. The cream cheese should be full-fat; Philadelphia brand works perfectly. For the pasta, elbow macaroni is ideal, but any short pasta shape will do. Cook it al dente—this sauce needs something to cling to without turning mushy. If you're prepping ahead, cook the pasta and store it in cold water until ready to mix.
No sharp cheddar? Pepper jack or smoked Gouda add interesting twists, though the classic flavor is hard to beat. Running out of cream cheese? Substitute with an equal amount of sour cream, though the texture will be slightly tangier. The mustard is crucial for depth—Dijon is best, but yellow mustard in a pinch works too. For the breadcrumb topping, Panko is key—it stays crispy. If you can't find it, crush regular bread into fine crumbs, but it won't be as light. The garlic powder can be swapped for 1/4 tsp fresh minced garlic if you're feeling fancy.
This casserole reheats beautifully—honestly tastes better the next day once everything melds together. Store leftovers in an airtight container for up to 5 days in the fridge. For longer storage, freeze portions for up to 3 months. The breadcrumb topping can be prepped ahead and stored separately until ready to bake. To make this ahead of time, assemble the entire dish (without baking), cover tightly, and refrigerate for up to 24 hours. Bake straight from the fridge—just add 10-15 minutes to the cooking time.
Why You'll Love This Recipe
- No Boil Struggle: I swear by this baked version—no pasta strainer drama, no water splashing everywhere. You just toss the dry elbows right into the pan with everything else, and the oven does all the work. (Yes, even on a Tuesday night.)
- Cheese Love Unleashed: That sharp cheddar and cream cheese combo? It’s like a hug in sauce form. The mustard cuts through the richness just enough to keep it bright, and the heavy cream makes it silky—no dry, gluey texture here.
- Leftovers That Beg: This dish actually gets better the next day. The pasta soaks up the sauce perfectly, and it reheats like a dream. Honestly, I make a double batch just so I can have it for lunch the following day without even thinking about it.
- Budget-Friendly Luxury: You’re using pantry staples here—no fancy ingredients, no markup. A block of sharp cheddar, a tub of cream cheese, and a can of mustard stretch this recipe into multiple meals without breaking the bank. (My wallet thanks me.)
Step-by-step instructions for baked macaroni and cheese
Master this creamy, bubbly classic with foolproof techniques for perfect texture every time.
🍳 Step 1: Cook the Elbow Macaroni to Al Dente Perfection
Bring a large pot of water to a rolling boil and add 1.5 lbs elbow macaroni. Stir immediately to prevent sticking. Cook until 1 minute before the package suggests for al dente—this ensures it finishes cooking in the oven without becoming mushy. Drain thoroughly in a colander, shaking to remove excess water.
I always reserve 1 cup of pasta water before draining. This starchy liquid is essential later for creating a silky sauce. Don't rinse the pasta—surface starch helps the cheese cling beautifully. The pasta should be hot when you mix it with the sauce, so work quickly to maintain temperature.
👨🍳 Step 2: Build the Ultra-Creamy Cheese Sauce
In a large mixing bowl, combine 2 cups sharp cheddar cheese, 8 oz cream cheese, 1 cup heavy whipping cream, 1 tbsp Dijon mustard, 1.5 tsp salt, and 0.5 tsp ground black pepper. Mix until completely smooth—no cheese lumps should remain. The mixture should be thick but pourable.
Here's the thing—cream cheese needs to be fully melted and incorporated for that signature velvety texture. If you see any unmelted chunks, place the bowl over a pot of simmering water for 30 seconds to gently warm and blend. The sauce should be smooth and glossy, not grainy. This is where the magic of ultra-creamy happens.
🥘 Step 3: Combine Pasta and Sauce
Add the drained macaroni to the cheese mixture and stir until every noodle is fully coated. The pasta will absorb some of the sauce, so don't worry if it looks slightly dry at first. This is normal and will correct itself in the oven. Taste and adjust seasoning if needed—you might want to add more salt or pepper to your preference.
Transfer the mixture to a greased 9x13-inch baking dish and spread it evenly. The top should be smooth and level—this ensures even browning. I use a rubber spatula to scrape up any sauce stuck to the bowl and distribute it evenly. Don't press down on the pasta—this creates a dense, heavy dish instead of the light, creamy texture we're after.
🔥 Step 4: Create the Signature Bubble-Top Crust
In a small bowl, mix together 0.5 cup panko breadcrumbs, 0.5 cup freshly grated parmesan cheese, 0.25 cup melted butter, 1 tsp garlic powder, and 0.25 cup milk. The mixture should be moist but not soupy—if it's too dry, add a splash more milk. Sprinkle this evenly over the top of the macaroni.
Bake at 375°F for 25-30 minutes until the top is golden brown and bubbly. The edges should be crispy while the center remains creamy. Here's the crucial part: don't open the oven during baking—this causes the cheese to set prematurely. The bubbles should be large and pronounced, indicating perfect texture. If the top browns too quickly, tent loosely with foil.
⏰ Step 5: Rest and Serve for Maximum Creaminess
Remove from the oven and let the macaroni rest for 10 minutes before serving. This resting period allows the sauce to thicken slightly and the flavors to meld together. The dish will be hot and bubbly when you take it out—this is exactly what we want.
Serve immediately with a side salad or steamed vegetables. The texture should be creamy yet slightly firm, with a crispy, golden crust on top. Each bite should deliver that perfect balance of cheesy richness and creamy smoothness. If you prefer extra crispiness, broil for 1-2 minutes at the end, watching closely to prevent burning.
Pro Tips For Making Bake Macaroni Sauce
- Cook pasta al dente: This isn’t just about taste—it’s about texture. Elbow macaroni should have a slight bite when you pull it from the pot, not mushy. Overcooking turns it into glue; undercooking leaves you chewing like a cow. Test a piece at 60 seconds before the package says "done"—that’s where the magic happens.
- Shred cheese aggressively: Sharp cheddar loses its edge when you use pre-shredded cheese (it’s coated with anti-caking agents that make the sauce grainy). Grab a box of block cheddar and shred it yourself—fine, even shreds melt smoother. If you’re lazy, buy pre-shredded but pulse it in a food processor first to break up those annoying clumps.
- Temper the cream: Dumping cold heavy cream into a hot sauce? That’s how you end up with a split sauce—oily and curdled. Warm the cream first by whisking it into the cream cheese mixture off the heat, then slowly adding it back. This keeps the sauce silky, not greasy.
- Add mustard last: Dijon mustard’s tang disappears when cooked too long. Stir it in just before baking—let the heat work for 5 minutes max, then remove from the oven. If you add it early, you’ll taste the raw bite, not the balanced flavor. Trust me, the last 5 minutes make all the difference.
Regional styles of these flavors
Classic American Comfort
This dish is the ultimate American comfort food, born from the heart of home cooking traditions. The creamy cheese sauce and crispy breadcrumb topping became popular in the early 20th century as a way to stretch ingredients during the Great Depression.
I grew up with this version—my grandmother always made it for Sunday dinners, and it became a staple in my childhood. The key to this regional style is the perfect balance between creamy sauce and crispy topping, creating that signature bubble-top texture. 🧀
Southern Cracker Barrel Style
In the Southern United States, this dish often gets a heartier twist with additions like crispy fried onions or a sprinkle of hot sauce. I love adding ¼ cup diced fried onions to the top before baking for extra crunch.
Some Southern cooks also include a layer of cornbread crumbs in the topping mix for a sweeter, nuttier flavor. The Southern version is often served with a side of buttery cornbread and a simple green salad to cut through the richness.
New England Clam Chowder Fusion
Up north, some creative cooks blend this dish with New England flavors by adding a light clam broth to the sauce. I've experimented with replacing ¼ cup of the milk with clam juice and adding ½ cup chopped clams to the pasta mixture.
The briny clams balance the creamy cheese beautifully. Top with extra parmesan and serve with crusty sourdough bread. This fusion version is perfect for coastal regions where seafood is abundant.
Midwest Meat Lover's Twist
The Midwest takes this dish to hearty new heights by adding ground beef or Italian sausage. I like cooking ½ lb ground beef with the pasta and mixing it into the sauce for extra protein. For a spicier kick, add ½ tsp smoked paprika to the breadcrumb topping.
This version is a staple at tailgates and family gatherings, often served with pickles and coleslaw on the side. The meat adds a satisfying depth that makes it a true comfort food powerhouse.
Western Southwest Fusion
Out west, this dish gets a Southwestern makeover with additions like black beans, corn, and jalapeños. I blend ½ cup black beans and ½ cup corn into the pasta mixture for texture, and add 1 diced jalapeño to the breadcrumb topping.
The result is a creamy, cheesy dish with a subtle kick of heat. Serve with a side of avocado slices and lime wedges for a refreshing contrast. This version is perfect for those who love bold flavors with their comfort food. 🌶️
Nutrition facts
Frequently asked questions
Can I use a different type of pasta for this recipe?
Elbow macaroni is ideal because its shape holds sauce beautifully, but any short pasta like penne, farfalle, or rotini works too. Avoid long pasta like spaghetti—it won't distribute sauce evenly when baked. The key is al dente texture so it finishes cooking in the oven without turning mushy.
Why did my cheese sauce turn grainy?
Grainy sauce usually means unmelted cheese chunks or insufficient liquid. Always use block cheese (not pre-shredded) and melt it gently over simmering water for 30 seconds if needed. If the sauce is too thick, add 1-2 tbsp milk or pasta water to restore creaminess. Stir constantly while heating to prevent lumps.
How do I make this dish ahead of time?
Assemble the entire casserole (without baking) and refrigerate for up to 24 hours. Bake straight from the fridge, adding 10-15 minutes to the cooking time. For longer storage, freeze portions in airtight containers for up to 3 months. The breadcrumb topping can be prepped separately and added just before baking.
Can I make this gluten-free?
Yes! Use gluten-free elbow macaroni and substitute gluten-free breadcrumbs for the panko. For the sauce, ensure all cheeses are certified gluten-free (some contain anti-caking agents with wheat). The texture will be slightly different but still delicious. Pro tip: Add 1 tbsp cornstarch to the sauce to help thicken it properly.
What's the best way to reheat leftovers?
Reheat in the oven at 350°F for 15-20 minutes until bubbly. Cover with foil to prevent drying. Microwaving works too—heat for 2-3 minutes on high, stirring halfway. Leftovers actually taste better the next day as flavors meld! Store in an airtight container for up to 5 days in the fridge.