Sauces & Condiments
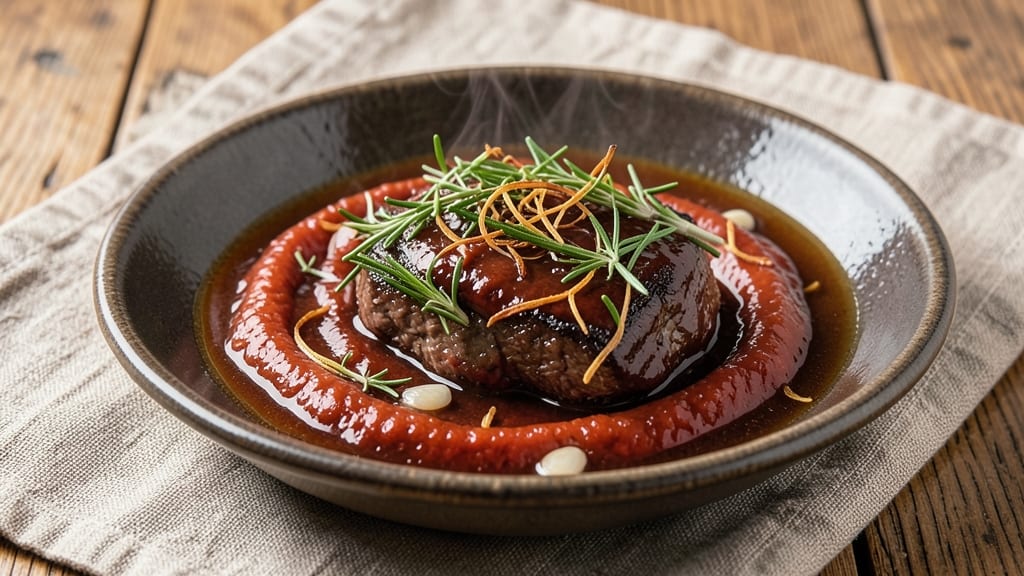
This beef basting sauce recipe transforms a simple pan-sear into a restaurant-worthy experience by locking in deep, caramelized flavors. The secret lies in a balanced blend of red wine, beef broth, and aromatic herbs that intensifies as it reduces, creating a glossy, rich glaze perfect for steaks, roasts, or kebabs.
I developed this sauce after years of testing—it’s the one that finally gave me that coveted charred crust and juicy interior every time.
The foundation starts with a quick deglaze of the pan using red wine, which captures all those meaty browned bits that hold so much flavor. From there, beef broth and a touch of tomato paste build a velvety base, while fresh herbs and garlic add aromatic depth.
The sauce reduces to a syrupy consistency, perfect for basting or finishing dishes with a glossy, flavor-packed sheen.
What sets this sauce apart is its versatility—use it to baste while cooking for maximum flavor infusion, or drizzle it over finished meat for an elegant finish.
The acidity from the wine cuts through the richness of the beef, while the herbs and broth create layers of umami that elevate even the simplest cut. It’s a game-changer for anyone who wants restaurant-quality results at home.
Best of all, this sauce comes together in just 15 minutes with pantry staples, making it ideal for weeknight dinners or special occasions. Whether you're searing a ribeye or grilling kebabs, this beef basting sauce will take your dish from good to unforgettable.
Let’s make it—your taste buds will thank you.
Ingredients for beef basting sauce
Pantry staples and a few fresh herbs transform ordinary beef into restaurant-worthy perfection.
| Ingredient | Amount | Notes |
|---|---|---|
| Red Wine 🍷 | ½ cup | Bold dry variety like Cabernet |
| Beef Broth 🍲 | 1 cup | Low-sodium preferred for balance |
| Tomato Paste 🍅 | 2 tbsp | Squeeze tube or canned |
| Garlic Cloves 🧄 | 3 cloves | Minced for aromatic depth |
| Fresh Rosemary 🌿 | ¼ cup | Chopped, stems removed |
| Fresh Thyme Leaves 🌿 | ¼ cup | Or 1 tbsp dried thyme |
| Shallot 🧅 | 1 whole | Minced, or sub 1 tbsp onion powder |
| Extra-Virgin Olive Oil 🫒 | 1 tbsp | High quality for richness |
| Balsamic Vinegar 🍶 | 1 tbsp | For depth and gloss |
| Salt 🧂 | 1 tsp | Diamond Crystal preferred |
| Black Peppercorns 🌶️ | ½ tsp | Freshly cracked |
The red wine is absolutely essential—any bold dry variety like Cabernet Sauvignon or Merlot works perfectly. If you don't have wine, beef broth with 1 tbsp balsamic vinegar gets you close. For the herbs, I always grab fresh rosemary and thyme from the grocery store's produce section—Trader Joe's has great bundles for this. The shallot adds sweetness that balances the wine's acidity, but if you're in a rush, onion powder works in a pinch. The tomato paste? I keep a squeeze tube in my pantry—no mess, lasts forever, and gives you that concentrated flavor without canned paste's watery texture.
No fresh rosemary? Dried works at one-third the amount, but fresh is ideal. The garlic can be pre-minced from a jar if you're short on time, though fresh minced has more punch. For extra richness, add 1 tbsp butter at the end—it creates this incredible glossy finish. If you're making this ahead, reduce the sauce by half before storing to prevent it from getting too thin. The balsamic vinegar might seem like an afterthought, but it's what gives this sauce that glossy, restaurant-quality sheen—don't skip it.
This sauce keeps beautifully in an airtight container in the fridge for up to 5 days, though it tastes even better the next day as the flavors meld. For longer storage, freeze portions in ice cube trays—just thaw and warm gently before using. I always make a double batch when I'm grilling; the extra sauce makes amazing sandwiches the next day. If you're using it immediately, keep it warm in a small saucepan on the stove—it's perfect for basting while your steak cooks.
Why You'll Love This Recipe
- Pantry Magic: I swear by this sauce because it uses stuff I already have—no last-minute grocery runs. That red wine and beef broth combo? It’s the backbone of flavor without needing fancy ingredients.
- Deep Umami Bomb: The tomato paste and garlic cloves caramelize into this rich, savory depth that clings to meat like a hug. Honestly, the first time I tasted it, I nearly burned my tongue waiting for the next bite.
- Weeknight Hero: This sauce turns a simple roast or steak into a showstopper with zero stress. Slap it on chicken thighs for dinner, then use the leftovers to dress up pasta the next day—no waste, all win.
- Budget Booster: A splash of red wine and a sprig of rosemary make this taste luxurious, but the cost? Peanuts. I’ve made gallons of it for family gatherings, and the leftovers freeze perfectly for future meals.
Step-by-step instructions for beef basting sauce
Here's how to build a sauce that transforms simple beef into a restaurant-worthy masterpiece.
Build the Flavor Base in Olive Oil
Heat the 1 tablespoon extra-virgin olive oil in a medium saucepan over medium heat. Add the 1 whole shallot and cook for 3-4 minutes until softened and translucent. Here's the thing—don't rush this step. You want the shallot to sweat out its moisture before it colors, which prevents bitterness and builds a sweet, aromatic foundation.
Add the 3 cloves minced garlic and cook for 30 seconds until fragrant. Watch carefully—garlic burns fast. As soon as you smell that glorious aroma, it's time to move to the next ingredient. The garlic should be golden, not brown, at this point. This is where the sauce gets its depth, so don't skip the garlic.
Develop the Sauce with Wine and Broth
Pour in the 0.5 cup red wine and scrape up any browned bits from the bottom of the pan with a wooden spoon. This deglazing step captures all the flavor you've built so far. Let the wine simmer for 2-3 minutes until reduced by about half—you'll see it go from a bright ruby color to a deeper, more concentrated hue.
Add the 1 cup beef broth and bring to a gentle simmer. Here's where the sauce starts to come together. The broth will help carry the wine's flavor while adding body. Let it simmer uncovered for 5 minutes to allow excess alcohol to evaporate—this makes the sauce richer and more complex.
Thicken and Season the Sauce
Stir in the 2 tablespoons tomato paste and let it cook for 1 minute, stirring constantly. The tomato paste will help thicken the sauce and add a subtle sweetness that balances the acidity from the wine. Add the 0.25 cup chopped fresh rosemary and 0.25 cup fresh thyme leaves, stirring to combine.
Pour in the 1 tablespoon balsamic vinegar and add the 1 teaspoon salt and 0.5 teaspoon freshly cracked black peppercorns. Let the sauce simmer for 5-7 minutes until it thickens slightly. You're looking for a consistency that coats the back of a spoon but still flows easily—this is perfect for basting. Taste and adjust seasoning if needed; you might want to add a pinch more salt to balance the acidity.
Finish and Use Immediately
Remove the sauce from heat and let it sit for 2 minutes to allow the flavors to meld. Here's the secret to using this sauce—it's best when fresh. The moment your beef is ready, pour the warm sauce over it and baste generously for 1-2 minutes before serving. The high heat of the pan will slightly reduce the sauce, intensifying its flavor and creating that glossy finish.
This sauce works magic on grilled steaks, roasted beef, or even pan-seared cuts. The key is to use it immediately—it won't keep well once made, so plan your cooking accordingly. The combination of wine, herbs, and tomato paste creates a sauce that's rich, aromatic, and packed with depth. Serve it warm over your beef and watch it disappear!
Pro Tips For Making Beef Basting Sauce
- Bloom the Garlic First: I learned this the hard way—raw garlic in wine just tastes like medicine. Sauté those cloves in oil until they’re golden and fragrant (about 2 minutes) before adding the wine. The flavor will deepen, and you’ll avoid that bitter aftertaste that sneaks in when you skip this step.
- Deglaze with Heat: Don’t let that wine sit there looking pretty—crank the heat to medium-high and let it bubble for 30 seconds after pouring. The alcohol needs to evaporate fast to concentrate the flavor, or you’ll end up with a sauce that tastes more like a diluted drink than a rich reduction.
- Strain the Rosemary: Fresh rosemary sprigs are great, but they turn to mush and make the sauce look like swamp water. Add them whole, then strain the sauce through a fine-mesh sieve before finishing. Your sauce will be silky, not fibrous, and the aroma will still shine through.
- Reduce the Broth Low: After adding the tomato paste and beef broth, resist the urge to blast it on high. Simmer gently for 10-15 minutes—low and slow lets the flavors meld without burning the tomato paste or making the wine taste harsh. Patience here makes a real difference.
Essential equipment for perfect results
Deglazing Pan Essentials
Your first tool is a stainless steel saucepan with a tight-fitting lid—I swear by All-Clad for even heat distribution. For deglazing, a wooden spoon (not metal) prevents scratching while scraping up flavorful browned bits. A heatproof spatula helps lift meat juices that cling to the pan during cooking. 🔥
Sauce Reduction Tools
Reducing the sauce requires patience, so a medium saucepan (2-3 quart capacity) works best. I use a tempered glass lid to monitor reduction without overheating. For precision, a digital kitchen scale helps measure ingredients accurately—especially the wine and broth. A fine-mesh strainer removes herbs if you prefer a smoother texture.
Basting Equipment
For basting directly over the heat, a baster brush (like OXO Good Grips) gives you control without over-saucing. A small ladle works too—just dip and drizzle. For finishing, a silicon baster (heat-resistant up to 500°F) lets you baste even over open flames.
Keep a small saucepan nearby to reheat extra sauce if needed.
Storage Containers
Store leftovers in glass airtight containers—I prefer Pyrex with snap-on lids. For freezing, silicone ice cube trays portion sauce perfectly for single-use applications. Label containers with dates—this sauce keeps 5 days refrigerated or 3 months frozen.
A fine-mesh strainer helps remove herbs before storing if you prefer a smoother texture later.
Heat Control Accessories
Use a kitchen thermometer to monitor sauce temperature—ideal reduction happens at 180-200°F. A heat diffuser (like Cuisinart) prevents hot spots if you're using high heat.
For stovetop control, I recommend induction burners—they heat evenly and respond instantly to temperature changes. A timer ensures you don’t over-reduce the sauce.
Nutrition facts
Frequently asked questions
Can I use this sauce for other meats besides beef?
While designed for beef, this sauce works beautifully with lamb, pork chops, or even hearty fish like salmon. The wine and herb combination pairs especially well with lamb, and the richness complements pork perfectly. For poultry, reduce the cooking time slightly to avoid overpowering delicate flavors.
How do I adjust the sauce if I don't have red wine?
No problem! Replace the wine with 1 cup beef broth plus 1 tablespoon balsamic vinegar for similar depth. For extra richness, add 1 tablespoon soy sauce or 1 teaspoon Worcestershire sauce. The sauce will still develop that glossy finish, though the wine's acidity and complexity will be slightly different.
Can I make this sauce ahead of time?
Yes, but it's best used fresh for maximum flavor. Make it up to 1 day ahead and store in an airtight container in the fridge. Reheat gently over low heat, stirring occasionally. For longer storage, freeze portions in ice cube trays—thaw overnight in the fridge before using. The sauce thickens as it cools, so you may need to add 1-2 teaspoons water when reheating.
Why does my sauce turn out too thin?
This usually happens from insufficient reduction time or too much liquid. Simmer uncovered for 5-10 extra minutes to thicken, or stir in 1 teaspoon cornstarch mixed with 1 tablespoon water to bind it. For future batches, reduce the broth by 2 tablespoons or increase simmering time by 5 minutes. The sauce should coat the back of a spoon but still flow easily.
What's the best way to baste beef with this sauce?
Use a basting brush or small ladle to apply sauce in 30-second intervals during the last 5-10 minutes of cooking. For steaks, baste both sides to create a glossy crust. For roasts, pour sauce over the top and baste the sides. The key is to work quickly—high heat helps the sauce caramelize and stick to the meat. Save some sauce to drizzle over finished meat for extra shine!