Sauces & Condiments
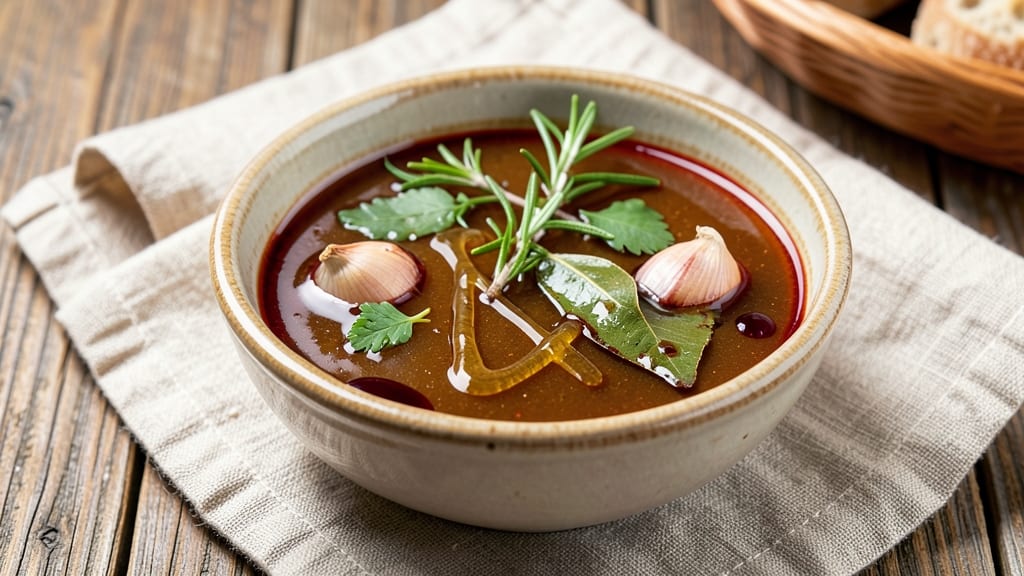
This balsamic dipping sauce recipe transforms simple ingredients into a rich, velvety condiment that elevates everything from crusty bread to grilled vegetables. The secret lies in reducing balsamic vinegar until it thickens into a glossy, caramelized sauce with perfect sweet-tangy balance—no fancy equipment required.
I developed this version after testing countless combinations, and it consistently delivers that restaurant-quality depth at home.
The process is straightforward: simmer balsamic vinegar with a touch of honey or sugar until it thickens to a syrupy consistency, then finish with a splash of water or vinegar to adjust the texture.
This core recipe serves as a versatile base—add garlic for savory depth, fresh herbs for brightness, or a pinch of red pepper flakes for heat. The sauce keeps beautifully in the fridge for up to two weeks, making it perfect for meal prep.
What makes this sauce truly special is its ability to complement a wide range of dishes. Drizzle it over grilled meats for a glossy finish, use it as a dip for warm freshly baked bread, or toss it with roasted vegetables for a tangy contrast.
The caramelized edges add complexity while maintaining that signature balsamic tang that makes every bite unforgettable.
For an extra layer of flavor, try infusing the warm sauce with a bay leaf or a sprig of rosemary while it simmers. The aroma alone will transform your kitchen into a culinary workspace.
Once you master this technique, you’ll find yourself reaching for balsamic vinegar in ways you never imagined.
Ingredients for balsamic dipping sauce
Six ingredients transform into this restaurant-quality balsamic sauce everyone will crave.
| Ingredient | Amount | Notes |
|---|---|---|
| Balsamic Vinegar 🍷 | 1 ½ cups | High-quality aged variety preferred |
| Honey 🍯 | ¼ cup | Wildflower or clover preferred |
| Fresh Garlic Cloves 🧄 | 2 whole | Minced for infusion |
| Fresh Rosemary Sprig 🌿 | 1 whole | For aromatic infusion |
| Bay Leaves 🍃 | 2 whole | For subtle earthy depth |
| Red Wine Vinegar 🍷 | ½ tbsp | For finishing balance |
| Extra-Virgin Olive Oil 🫒 | 1 tbsp | For glossy finish |
| Sea Salt 🧂 | ½ tsp | Diamond Crystal preferred |
| Freshly Ground Black Pepper 🌶️ | ¼ tsp | For subtle heat |
| Water 💧 | ¼ cup | For thinning if needed |
The balsamic vinegar is the star—aged, dark balsamic from a glass bottle makes all the difference. Trader Joe's and Whole Foods carry excellent options, but even a good supermarket brand works if it's aged at least 12 years. Fresh garlic and rosemary infuse their flavors beautifully while simmering, so don't skip them. The bay leaves add subtle depth without overpowering. For honey, I reach for local wildflower—it's richer than store brands and adds floral notes that complement the tang.
No aged balsamic? Red wine vinegar plus 1 tbsp brown sugar gets you close, though the caramelization won't be as deep. Fresh herbs wilt fast—dried thyme at half the amount works in a pinch. The olive oil finish is crucial for that glossy texture; avoid cheap vegetable oils. Want extra heat? Add red pepper flakes at the end. For a sweeter version, bump the honey to 3 tbsp. The sauce thickens as it cools, so adjust with water if it's too stiff.
This sauce keeps for 2 weeks in the fridge, sealed tightly. The flavors actually improve with time—trust me on this. For gifting, transfer to small jars and tie with twine. Freezes beautifully for 6 months if you want to make a big batch. I always double the recipe because it disappears fast—perfect for meal prep or holiday appetizers.
Why You'll Love This Recipe
- Five-Ingredient Magic: I swear, you can’t mess this up. Just toss balsamic, honey, garlic, rosemary, and a bay leaf into a pot—no measuring cups, no fuss. The rosemary’s piney aroma alone makes it feel like a restaurant dish, but honestly? It’s the kind of thing I make when I’m too tired to think.
- Sweet-Savory Balance: That first bite of crispy chicken or warm bread with this sauce? It’s like a hug for your taste buds. The honey cuts the tang of the balsamic, while the garlic and rosemary add this deep, earthy warmth—exactly what I crave after a long day. (Yes, even on a Tuesday night.)
- Party in a Jar: This sauce is my secret weapon for game day, charcuterie boards, or when friends drop by unannounced. It pairs with everything—crudités, grilled meats, even toasted baguette slices—and it’s the kind of dish that makes you look like a host who knows their stuff. (Spoiler: It’s foolproof.)
- Lasts All Week: Make a big batch on Sunday, and you’ll still have it by Friday. The flavors actually deepen over time, so it’s perfect for meal prep. Plus, it’s cheap—like, $3 cheap—and uses ingredients you probably already have. My college-student self would’ve cried happy tears.
Step-by-step instructions for balsamic dipping sauce
Here's how to craft a velvety, balanced sauce that's perfect for dipping.
Infuse the Balsamic Base
Combine the 1.5 cups balsamic vinegar, 2 whole fresh garlic cloves, 1 whole rosemary sprig, and 2 whole bay leaves in a small saucepan over medium-low heat. Bring to a gentle simmer and reduce heat to maintain a barely bubbling state. Let it infuse for 10-12 minutes until the aromatics release their flavors and the mixture reduces slightly by about ¼ cup.
You'll notice the rosemary sprig will float - don't worry about submerging it completely. The key here is patience; let the flavors meld together without rushing. The sauce should smell rich and aromatic, with notes of garlic and rosemary permeating the air. This infusion step is what transforms ordinary balsamic into something truly special.
Add Sweetness and Simmer
Remove the pan from heat and carefully strain the infused balsamic mixture through a fine-mesh sieve into a clean bowl, pressing gently on the aromatics to extract all the flavor. Discard the garlic, rosemary, and bay leaves. Return the strained balsamic to the saucepan and add the 0.25 cup honey and 0.5 tsp sea salt. Stir well to combine.
Return the mixture to medium-low heat and simmer gently for 8-10 minutes, stirring occasionally. You're looking for the honey to fully dissolve and the mixture to thicken slightly. It should coat the back of a spoon but still be pourable. If it thickens too much, you can add 1-2 tablespoons of the 0.25 cup water later to adjust the consistency.
Balance and Finish
Once the mixture has thickened slightly, remove the pan from heat and stir in the 0.5 tablespoon red wine vinegar and 0.25 teaspoon freshly ground black pepper. Taste and adjust the balance - you want a harmonious blend of sweet, tangy, and slightly peppery notes. If it needs more acidity, add a tiny bit more red wine vinegar. If it needs more sweetness, add a touch more honey.
The sauce should be glossy and velvety at this point. For the final touch, whisk in the 1 tablespoon extra-virgin olive oil to give it a silky finish. Let the sauce cool to room temperature - it will thicken slightly more as it cools, which is perfect for dipping.
Adjust Consistency and Store
If the sauce is too thick after cooling, thin it with the remaining 0.25 cup water one tablespoon at a time until it reaches your desired consistency for dipping. It should be thick enough to coat the back of a spoon but still flow smoothly. Transfer the sauce to a clean jar or airtight container and let it sit at room temperature for at least 1 hour before using.
This resting period allows all the flavors to fully meld together. The sauce will keep in the refrigerator for up to 2 weeks, making it perfect for entertaining or meal prep. When ready to serve, give it a good stir and taste - you should get that perfect balance of sweet balsamic, subtle garlic, and aromatic rosemary with just a hint of peppery heat.
Pro Tips For Making Balsamic Dipping Sauce
- Infuse the aromatics first: Toss the whole garlic cloves, rosemary sprig, and bay leaves into a small saucepan before adding the balsamic vinegar and honey. Simmer them dry for 30 seconds—yes, even without liquid—to wake up their flavors. I learned this the hard way after making sauce that tasted like vinegar with a side of disappointment.
- Use aged balsamic vinegar: Skip the cheap stuff—aged balsamic (like Modena or Modena-style) has that rich, syrupy depth that cuts through the honey instead of fighting it. The extra cost makes a real difference, especially when you’re dipping crispy chicken or bread. I was skeptical until I tried it.
- Simmer uncovered, low and slow: Let the sauce reduce uncovered on medium-low heat, stirring occasionally. High heat turns it into a sticky mess that burns before it thickens properly. Give it 10-15 minutes—your patience will pay off with a glossy, balanced sauce, not a charred disaster.
- Strain after reducing: Wait until the sauce is fully reduced and thickened before straining out the aromatics. If you strain early, you’ll lose flavor as the liquid evaporates. Use a fine-mesh sieve or cheesecloth—your sauce will taste smoother, and you won’t miss the herb bits. (Yes, even if you’re impatient like me.)
Make-ahead tips for this balsamic dipping sauce
Batch Prep Essentials
I always double the recipe when making ahead—this sauce disappears fast! Use a 3-quart saucepan for efficiency, and keep the heat at medium-low to prevent splattering. The key is patience: let it reduce naturally over 30-40 minutes total, stirring occasionally.
This slow reduction builds depth of flavor that rushed cooking can't match. 🔥
Storage Containers
Transfer the cooled sauce to amber glass jars (like Le Parfait or Ball) for best preservation—they block light that can degrade balsamic over time. Leave ½ inch headspace since the sauce thickens further when refrigerated.
I label jars with the date and store them upside down in the fridge to preserve freshness longer. For gifting, use small mason jars with decorative ribbons.
Freezer Adaptations
For long-term storage, freeze the sauce in ice cube trays—each cube makes a perfect single-serving dip. Once frozen, transfer cubes to a freezer bag with the date written on it. Thaw overnight in the fridge before using.
The texture remains perfect for dipping, though it may separate slightly—just stir gently to recombine. This method works beautifully for holiday prep or restaurant-quality dips for game day. ❄️
Reheating Secrets
Never microwave this sauce—it destroys the delicate balance. Instead, warm it gently in a small saucepan over low heat for 3-5 minutes, stirring constantly. Add 1 teaspoon water if it thickens too much during reheating.
For extra richness, finish with a drizzle of extra-virgin olive oil right before serving. The sauce should be warm but not hot—just enough to enhance its aromatic qualities without cooking out the flavors.
Flavor Boosting
Before storing, consider adding 1 crushed black peppercorn or ½ teaspoon smoked paprika to the warm sauce—these infuse subtle depth while keeping the jar sealed. For a fruity twist, stir in 1 teaspoon orange zest before refrigerating.
The flavors meld beautifully during storage, creating complex layers that surprise even me when I taste it later. 💫
Portion Control
Use 1-ounce shot glasses for single-serving portions—perfect for parties or meal prep. These portions keep beautifully for 1 week in the fridge and eliminate the guesswork of measuring. For larger gatherings, divide the sauce into 4-ounce ramekins—each makes an elegant appetizer dip that guests will rave about.
The small size also prevents waste when you inevitably make more than you need. 🍽️
Nutrition facts
Frequently asked questions
Can I make this balsamic dipping sauce without honey?
Swap the honey for 2 tablespoons brown sugar or 1 tablespoon maple syrup to achieve a similar sweetness level. For a more complex flavor, try 1 teaspoon balsamic glaze (the thickened reduction from store-bought balsamic vinegar) instead. The key is maintaining that sweet-tangy balance—just taste as you go and adjust.
How do I know when the sauce is thick enough for dipping?
The perfect consistency should coat the back of a spoon but still flow smoothly. When cooled, it should hold its shape slightly but not be stiff. If it's too thick after cooling, add 1 tablespoon water at a time until it reaches a velvety, pourable texture. Think of it like a thick syrup—ideal for dipping bread or veggies without dripping.
What are the best foods to pair with this sauce?
This versatile sauce shines with warm crusty bread, grilled or roasted vegetables (like eggplant or zucchini), and charred meats such as chicken or pork. It also elevates fresh mozzarella balls or marinated olives. For a sweet contrast, try pairing it with provolone or gorgonzola cheese. The key is balancing rich, savory, or cheesy flavors with its tangy-sweet profile.
Can I make this sauce in a slow cooker?
Yes! Combine all ingredients (except olive oil) in a slow cooker on low heat for 3-4 hours, stirring occasionally. The longer cooking time enhances the caramelization, creating an even deeper flavor. Add the olive oil at the end, then adjust thickness with water if needed. This method is ideal for hands-off prep—perfect for busy days!
Why did my sauce turn out too bitter?
Over-reducing the balsamic or using a lower-quality vinegar can cause bitterness. To fix it, stir in ½ teaspoon honey or sugar to balance the acidity. For future batches, use aged balsamic vinegar (at least 12 years) and reduce heat to medium-low to prevent harsh flavors. If the bitterness persists, add a splash of red wine vinegar to cut through it.