Sauces & Condiments
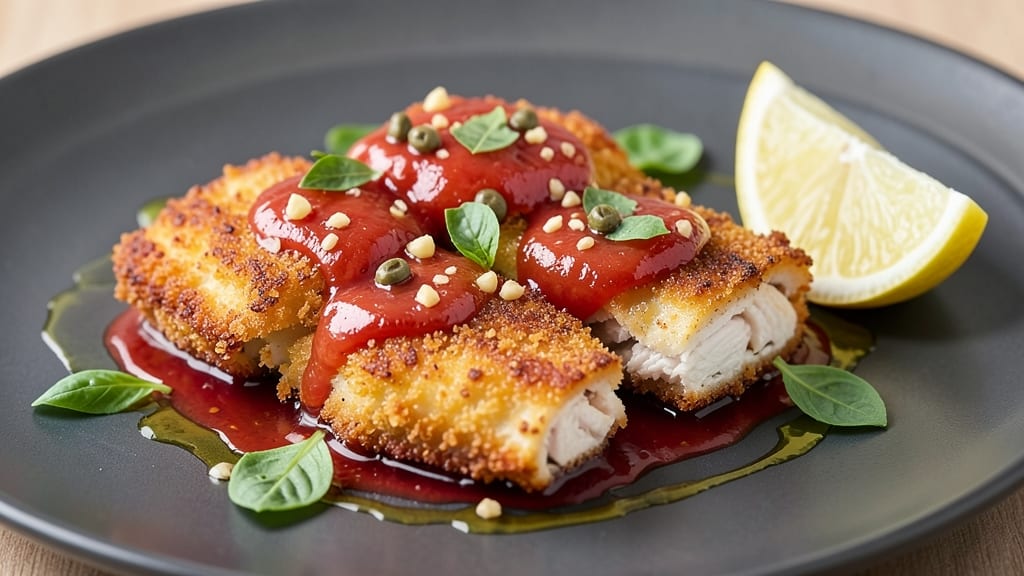
This crispy lemon chicken cutlets recipe delivers the perfect balance of golden-brown crunch and bright, herby salmoriglio sauce—every bite is a harmony of textures and flavors.
The secret lies in a crispy panko breading that locks in juices while creating that coveted crunch, paired with a sauce that's tangy, garlicky, and packed with Mediterranean brightness. I've perfected this technique through years of testing, ensuring the chicken stays tender inside while achieving that restaurant-quality exterior.
The salmoriglio sauce transforms ordinary chicken into something extraordinary—its lemony, caper-infused profile cuts through the richness of the crispy cutlets beautifully. What makes this recipe truly special is how the sauce's acidity enhances the breading's crunch, creating a contrast that keeps every bite exciting.
The process is straightforward but requires attention to detail during pan-frying to maintain that perfect crispiness without drying out the meat.
By the time you plate these cutlets with their vibrant green parsley garnish and drizzle of salmoriglio, you'll have a dish that looks as impressive as it tastes.
The sauce's fresh herbs and bright lemon flavor make this perfect for spring or summer dinners, while the crispy texture satisfies any craving for comfort food. This combination is restaurant-quality without requiring advanced skills—just precise technique and quality ingredients.
Serve with a simple arugula salad or roasted potatoes to complete the meal—each component complements the crispy chicken and herby sauce perfectly. The recipe delivers on its promise of crispy perfection while keeping the preparation accessible for home cooks.
Let's get started on creating this zesty, crunchy masterpiece that will have everyone asking for seconds.
Ingredients for crispy lemon chicken cutlets with salmoriglio sauce
Golden panko crunch meets zesty Mediterranean brightness—here's everything you need for restaurant-quality crispy lemon chicken cutlets.
| Ingredient | Amount | Notes |
|---|---|---|
| Boneless, Skinless Chicken Breast Cuttlets 🍗 | 1 ½ lb | Pounded to even 1/4-inch thickness |
| All-Purpose Flour 🌾 | ¾ cup | For dredging, sifted if lumpy |
| Japanese Panko Breadcrumbs 🍞 | 1 ½ cups | Light and crispy variety |
| Large Eggs 🥚 | 2 whole | Room temperature for even coating |
| Extra-Virgin Olive Oil 🫒 | ½ cup | For frying, light flavor preferred |
| Fresh Lemon Juice 🍋 | ½ cup | From 2-3 lemons, freshly squeezed |
| Capers 🍅 | 2 tbsp | Nonpareils, rinsed and drained |
| Garlic Cloves 🧄 | 6 cloves | Finely minced for sauce |
| Fresh Parsley Leaves 🌿 | ½ cup | Chopped, flat-leaf preferred |
| Fresh Dill Weeds 🌿 | ¼ cup | Chopped, stems removed |
| Kosher Salt 🧂 | 1 ½ tsp | Diamond Crystal preferred |
| Ground Black Pepper 🌶️ | ½ tsp | Freshly ground for best flavor |
| Vegetable Oil 🫒 | ½ cup | High smoke point for frying |
| Fresh Lemon Zest 🍋 | 1 tbsp | From 1 organic lemon |
The chicken cutlets are the foundation, so look for boneless, skinless breasts with minimal fat—this ensures even cooking and maximum crispiness. Pounding them to 1/4-inch thickness is non-negotiable; thicker pieces won't brown properly. Trader Joe's and Whole Foods carry excellent pre-cut chicken cutlets, but if buying whole breasts, slice them yourself for consistency. The panko matters too—Japanese-style gives that light, airy crunch, while regular breadcrumbs turn dense. Keep everything cold until frying to prevent premature browning.
No panko? Crush plain bread into fine crumbs and toast in a dry pan for 3 minutes to mimic the texture. Fresh herbs are essential—dried dill at half the amount works in a pinch, but nothing beats the bright flavor of fresh. The capers add briny depth, so rinse them well if they've absorbed too much brine. For extra zing, add a pinch of red pepper flakes to the sauce. Lemon juice should be freshly squeezed; bottled lacks the vibrant acidity. And if you're feeling fancy, infuse the olive oil with lemon zest for 10 minutes before frying—trust me on this.
These cutlets stay crispy for about 20 minutes after frying, so work quickly when plating. The salmoriglio sauce keeps beautifully in the fridge for 3-4 days—just give it a quick stir before drizzling. For make-ahead prep, fry the cutlets, cool completely, then freeze them on a tray before transferring to a bag. Re-crisp in a 375°F oven for 8-10 minutes. The sauce freezes too, though texture may separate slightly—just whisk vigorously to recombine. Garnish with extra parsley and lemon zest right before serving for that restaurant-worthy presentation.
Why You'll Love This Recipe
- No-Fuss Coating: I swear by the flour-egg-panko combo here—just three quick dredges, no fancy techniques. The panko gives that shatteringly crisp crust without needing a deep fryer, and honestly? My hands stay clean while the chicken gets golden perfection.
- Zesty Lemon Magic: That salmoriglio sauce is where it happens—bright, garlicky, and tangy all at once. The lemon zest clings to the crispy cutlets like a hug, and between us, I’ve never had plain chicken taste this alive. It’s the kind of flavor that makes you pause mid-bite.
- Weeknight to Dinner Party: Same recipe, totally different vibes. Toss it together for a lazy Tuesday or dress it up with arugula salad for a fancier night. The cutlets reheat beautifully too—my college-aged son’s go-to when I pack extras for his "I’m too tired to cook" days.
- Budget Crispy Luxury: Chicken breasts are affordable, and this method turns them into something restaurant-worthy without breaking the bank. A single egg and bag of panko stretch for multiple meals, and the olive oil’s high smoke point means no wasted drippings. That’s my kind of smart spending.
Step-by-step instructions for crispy lemon chicken cutlets
Here's how to achieve that perfect golden crust and bright, herby salmoriglio sauce every time.
Prepare the Chicken Cutlets for Maximum Crispiness
Start by pounding the 1.5 lb boneless, skinless chicken breast cutlets to an even ¼-inch thickness using a meat mallet wrapped in plastic wrap. This ensures even cooking and prevents dryness in the center. Place each cutlet between two sheets of plastic wrap and apply firm, even pressure—you should hear a satisfying crack as the meat yields. The goal is uniform thickness so all pieces cook at the same rate.
Season both sides generously with 1.5 tsp kosher salt and 0.5 tsp ground black pepper. I like to press the seasoning in gently with my fingers so it adheres well. Let the seasoned cutlets rest at room temperature for 15-20 minutes before breading. This step is crucial—it allows the meat to cook more evenly and prevents shocking the chicken when it hits the hot oil.
Create the Perfect Breading Station
Set up three shallow bowls for your breading station. In the first bowl, place the 0.75 cup all-purpose flour and mix with 0.5 tsp ground black pepper and 0.5 tsp kosher salt (reserving a pinch for later). In the second bowl, beat the 2 whole large eggs until just combined, then whisk in 1 tbsp fresh lemon zest and 0.5 cup fresh lemon juice. In the third bowl, place the 1.5 cups Japanese panko breadcrumbs—this light, crispy variety is essential for that perfect crunch.
Work quickly but methodically. Dip each cutlet into the flour mixture, shaking off any excess, then into the egg wash, letting any excess drip off, and finally into the panko breadcrumbs, pressing gently to ensure even coverage. I find it helps to use a fork to hold the cutlet steady while pressing the breadcrumbs. Let the breaded cutlets rest on a wire rack for 5 minutes before frying—this helps the coating adhere better and prevents a soggy crust.
Pan-Fry to Golden Perfection
Heat 0.5 cup vegetable oil in a large skillet over medium-high heat until it shimmers but doesn't smoke—around 350°F. The oil should be hot enough that a breadcrumb sizzles and turns golden within 10 seconds of hitting the pan. Add the breaded cutlets in a single layer, being careful not to overcrowd the pan. This ensures they cook evenly and develop that beautiful golden-brown crust.
Cook for 3-4 minutes per side until the cutlets are deep golden brown and the internal temperature reaches 165°F. You'll know they're ready when the edges are crisp and the chicken releases easily from the pan. Transfer the cooked cutlets to a paper towel-lined plate to drain excess oil. Keep them warm in a 200°F oven while you prepare the salmoriglio sauce.
Whisk Together the Bright, Herb-Infused Salmoriglio
In a small bowl, combine the 0.5 cup extra-virgin olive oil, 0.5 cup fresh lemon juice, 2 tbsp capers, 6 cloves minced garlic, 0.5 cup chopped fresh parsley leaves, and 0.25 cup chopped fresh dill weeds. Add the remaining 0.5 tsp kosher salt and 0.25 tsp ground black pepper. Whisk vigorously for 30 seconds until the capers and garlic are fully incorporated and the mixture is emulsified.
Taste and adjust the seasoning—you want a balance of bright lemon, briny capers, and fresh herbs. If the sauce seems too thick, whisk in 1-2 teaspoons of water to reach a drizzling consistency. This sauce is what makes these cutlets truly special, so don't skimp on the fresh herbs. The vibrant green color is your visual cue that it's ready to elevate the dish.
Assemble and Serve Immediately
Return the cutlets to the skillet and pour the salmoriglio sauce evenly over the top. Toss gently to coat, then transfer to serving plates. The residual heat from the pan will help the sauce cling beautifully to the crispy chicken. Serve immediately while the cutlets are still warm and the crust is at its peak crunch. Each bite should deliver that perfect contrast of crispy exterior, tender chicken, and bright, herby sauce.
For an extra touch, garnish with additional fresh lemon zest and a sprinkle of chopped parsley. The zesty aroma will make your kitchen smell amazing, and the presentation will look like it came straight from a Mediterranean bistro. Enjoy these cutlets while they're hot—they're best served immediately!
Pro Tips For Making Crispy Lemon Chicken Cutlets With Salmoriglio Sauce
- Pound Chicken Thin: Chicken breasts are stubborn—thin them to ¼-inch or less before dredging, or the center will stay rubbery. I used to skip this and ended up with cutlets that looked crispy outside but tasted dry. A meat mallet or rolling pin works, but if you’re in a rush, zip-lock bags with a heavy pan do the job.
- Dry the Flour Well: Tap the floured cutlets gently on the counter to remove excess before dipping in egg—this prevents a soggy crust. I learned this the hard way after making a batch where the flour clumped and turned to paste. A quick shake in a fine-mesh strainer works too, if you’re patient.
- Use Cold Olive Oil: Heat the oil to 350°F (175°C) and keep it steady—no need to go higher, or the panko will burn before the chicken cooks. After frying a batch, I once cranked the heat to "get it done faster," and the cutlets came out greasy and dark. A thermometer is worth the investment here.
- Rest Before Frying: Let the breaded cutlets sit on a wire rack for 5 minutes after dredging—this lets the panko adhere better and makes flipping easier. I used to skip this and ended up with crumbs sliding off mid-fry. Yes, it’s an extra step, but it guarantees that shatteringly crisp crust.
Common mistakes when making perfect results
Overcrowding the Pan
One of the biggest mistakes is overcrowding the pan with too many cutlets at once. When you pile them in, the oil temperature drops dramatically, causing the chicken to steam instead of fry.
This leads to soggy, unevenly cooked cutlets with a greasy texture rather than that crispy crust we're after. 🔥
Instead, fry the cutlets in batches—no more than two at a time in a large skillet. This maintains the oil's temperature and ensures each piece gets that perfect golden-brown sear.
If you're making a big batch, work in two pans or fry in stages. Patience here pays off with restaurant-quality results.
Skipping the Resting Time
Many home cooks rush the resting step after seasoning the chicken, but letting the cutlets sit at room temperature for 15-20 minutes is crucial. Cold chicken hits hot oil and can cause uneven cooking or even a dangerous oil splatter.
The resting time allows the meat to come to room temperature, ensuring even cooking and that perfect crispy exterior.
I've made this mistake too—skipping the rest leads to chicken that's dry on the outside and raw in the center. Trust the process: let those cutlets breathe before breading and frying. Your patience will be rewarded with juicy, tender chicken every time.
Using Cold Ingredients
Another common error is using cold eggs or cold oil for frying. Cold eggs won't coat the cutlets evenly, leading to clumpy breading that falls off during frying. Cold oil takes longer to heat up, causing the chicken to absorb too much oil and lose its crispiness.
Always use room-temperature eggs and properly heated oil for best results.
To avoid this, take your eggs out of the fridge 30 minutes before breading. For the oil, heat it gradually over medium heat until it reaches 350°F—a breadcrumb should sizzle and turn golden within 10 seconds of hitting the pan.
Test it before adding the chicken to ensure it's ready.
Overmixing the Breading
When dredging the chicken, it's tempting to press the panko breadcrumbs extra hard to make sure they stick. But overpressing can cause the coating to become too dense, leading to a heavy, less crispy texture. The breadcrumbs should adhere lightly but firmly—just enough to create that perfect crunch without compacting.
Instead, use a gentle but firm press with your fingers or the back of a fork. Let the coating set for 5 minutes on a wire rack before frying.
This brief resting period helps the breading adhere properly without turning into a dense, soggy mess. The result? Light, airy crunch that shatters beautifully with each bite.
Undercooking or Overcooking
Finding the perfect doneness is tricky—undercooked chicken is unsafe, while overcooked chicken becomes dry and tough. The key is watching for an internal temperature of 165°F while maintaining that golden-brown crust. Most cutlets take 3-4 minutes per side in properly heated oil.
To avoid this, invest in a good instant-read thermometer. Insert it into the thickest part of the cutlet—when it hits 165°F and the edges are deep golden brown, it's ready.
If you don't have a thermometer, cut into one piece to check doneness. The chicken should be opaque throughout with no pink, and the juices should run clear.
Neglecting the Sauce Timing
The salmoriglio sauce is what transforms these cutlets from good to extraordinary, but many cooks make the mistake of preparing it too early. If you let the sauce sit while the chicken fries, the fresh herbs will wilt and the lemon juice will lose its brightness.
The sauce should be made just before serving to maintain its vibrant flavor and texture.
Assemble the sauce in a small bowl right before tossing it with the chicken. If you need to prep ahead, store the ingredients separately and whisk them together fresh.
The contrast of warm, crispy chicken with bright, herby sauce is what makes this dish so special—don't let that magic fade by preparing the sauce too soon. ✨
Nutrition facts
Frequently asked questions
Can I use chicken thighs instead of breasts for this recipe?
Yes, but with adjustments! Chicken thighs have more fat and stay juicier, so they don't need the same thin pounding. Use 1-inch thick thighs cut into cutlets, and reduce frying time to 2-3 minutes per side—they'll cook faster. The crispy coating will still work beautifully, but expect slightly less tenderness since thighs are more forgiving when overcooked.
How do I keep the cutlets crispy when serving?
Serve immediately for maximum crunch, but if you need to hold them, keep warm in a 200°F oven on a wire rack (not a plate) for up to 15 minutes. For extra insurance, sprinkle with 1/4 cup cornstarch before frying—the starch helps maintain crispiness. Avoid covering with foil, which traps steam and makes the coating soggy.
What's the best way to store leftovers?
Store the cutlets and sauce separately. Place fried cutlets on a wire rack in the fridge to cool completely, then transfer to an airtight container. The sauce keeps in the fridge for 3-4 days. To reheat, warm the cutlets in a 375°F oven for 8-10 minutes—they'll recapture some crispiness. The sauce can be reheated gently on the stove (don't boil) and whisked to restore texture.
Can I make the salmoriglio sauce ahead of time?
Yes, but with a twist! Combine all ingredients except herbs, then refrigerate in an airtight container. Just before serving, whisk in fresh chopped parsley and dill—this preserves their vibrant color and flavor. The sauce will last 3 days refrigerated—the lemon juice helps preserve freshness. For freezing, store without herbs and add them fresh after thawing.
What are the best sides to serve with these cutlets?
This Mediterranean-inspired dish pairs perfectly with light, fresh sides. Try a simple arugula salad with lemon vinaigrette, roasted fingerling potatoes with rosemary, or creamy polenta. For a complete meal, add steamed green beans with almonds. The bright acidity of the salmoriglio sauce makes it ideal for balancing richer sides like mashed potatoes or crusty bread.