Sauces & Condiments
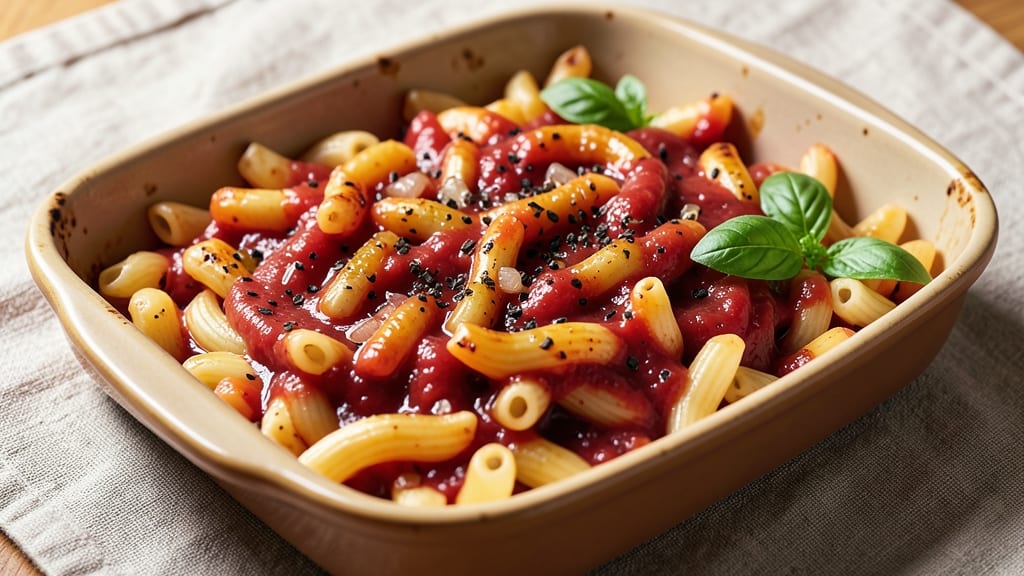
A baked macaroni and red sauce recipe transforms weeknight dinners into cheesy, bubbling comfort with minimal effort. This one-pan method combines tender pasta, rich tomato sauce, and melted cheese into a foolproof dish that delivers restaurant-quality results in just 30 minutes.
The key? Layering the ingredients properly so every bite is packed with flavor and gooey goodness.
What sets this recipe apart is the balance of textures—al dente pasta, creamy sauce, and a golden, crispy cheese topping that holds together like a perfect blanket of cheesy perfection. You’ll need basic pantry staples, a single baking dish, and a little patience while the oven works its magic.
The result? A hearty, satisfying meal that’s perfect for families, game days, or anyone craving a no-fuss dinner.
By the time it emerges from the oven, you’ll have a dish that’s rich, cheesy, and impossible to resist—with that signature bubbly, golden crust that signals it’s ready to eat.
The aroma alone will have everyone gathering around the table, and the first bite delivers on all the comfort food promises. This recipe is designed to be your go-to for busy nights when you want flavor without the fuss.
Pair it with garlic bread, a simple green salad, or crusty rolls to round out the meal. The beauty of this dish is its versatility—it’s hearty enough for a main course but light enough to feel balanced. Let’s get started on this one-pan wonder that’s equal parts comforting and impressive.
Ingredients for baked macaroni red sauce
Basic pantry staples transform into cheesy, bubbling comfort with minimal prep.
| Ingredient | Amount | Notes |
|---|---|---|
| Elbow Macaroni 🍝 | 12 oz | Uncooked, standard shape |
| Canned Tomato Sauce 🍅 | 2 cups | High-quality, no sugar added |
| Onion 🧅 | 1 whole | Medium size, diced small |
| Garlic Cloves 🧄 | 3 cloves | Fresh, minced finely |
| Ground Black Pepper 🌶️ | ½ tsp | Freshly cracked preferred |
| Salt 🧂 | 1 ½ tsp | Kosher or sea salt |
| Shredded Mozzarella Cheese 🧀 | 2 cups | Part-skim or whole milk |
| Grated Parmesan Cheese 🧀 | ½ cup | Freshly grated from block |
| Unsalted Butter 🧈 | 2 tbsp | Melted for creamy texture |
| Italian Seasoning 🌿 | 1 tsp | Dried blend preferred |
| Heavy Cream 🥛 | ¼ cup | Full-fat for richness |
| Breadcrumbs 🍞 | ¼ cup | Panko for extra crunch |
The cheese is where this dish shines. Part-skim mozzarella melts perfectly without getting greasy, but whole milk mozzarella adds extra richness if you're feeling indulgent. Grab a block of Parmesan and grate it yourself—pre-grated tastes like sawdust. For the tomato sauce, Rao's or Muir Glen are reliable brands, but any no-sugar-added canned sauce works. The butter matters too—use unsalted so you control the seasoning. Store-brand butter is fine, just make sure it's cold when you measure it.
No Italian seasoning? Mix dried basil, oregano, and thyme at equal parts. Running low on breadcrumbs? Crushed cornflakes or cracker crumbs work in a pinch. The garlic can be jarred if fresh isn't available, but minced fresh garlic gives the best flavor. For a quicker version, use pre-cooked pasta (like rotini or cavatappi) to cut down on cooking time. The heavy cream adds luxury, but half-and-half or extra tomato sauce keeps it budget-friendly without sacrificing too much creaminess.
This keeps beautifully for 3-4 days in the fridge, but honestly tastes even better the next day as everything melds together. For make-ahead meals, assemble everything in the baking dish, cover with foil, and refrigerate. Bake straight from cold—just add 10 extra minutes to the cooking time. The leftovers reheat perfectly in the oven at 350°F for 15 minutes. Portion into individual containers for easy lunches or freezer meals.
Why You'll Love This Recipe
- One-Pan Magic: I swear by this recipe when I’m too tired to wash dishes. Toss everything—pasta, sauce, onions—into one baking dish, add a sprinkle of garlic and pepper, and it’s done. No boiling, no straining, just hands-off baking until it’s bubbly and golden.
- Garlic-Pepper Punch: That fresh garlic and cracked black pepper? It’s the secret weapon. The sauce gets deep, savory, and just a little spicy kick—enough to make you crave it again before the plate’s even empty. Honestly, I’ve had people ask for the recipe just for the sauce alone.
- Lunchbox Hero: Between us, this is my go-to for meal prep. Bake a big batch, portion it into containers, and reheat it straight from the fridge. The pasta stays sturdy, the sauce clings perfectly, and my kids (and husband) actually eat it cold for lunch—no complaints.
- Budget Night Savior: Canned tomato sauce and elbow macaroni? Check. Minimal ingredients, maximum flavor. I make this when my grocery budget’s tight, and it still feels like a proper meal. Plus, leftovers taste just as good the next day—sometimes even better after the flavors meld.
Step-by-step instructions for baked macaroni and red sauce
This one-pan method delivers restaurant-quality cheesy macaroni with minimal effort.
🍳 Step 1: Sauté Onions and Garlic for Flavor Foundation
Melt the 2 tablespoons unsalted butter in a large oven-safe skillet over medium heat. Add the 1 whole onion that's been diced small and cook for 5 minutes until softened and translucent. I like to stir occasionally to prevent browning.
Add the 3 cloves garlic cloves that have been minced finely and cook for another 30 seconds until fragrant. You'll know it's ready when the kitchen smells like fresh garlic—this is your flavor anchor. Remove the pan from heat temporarily while you prepare the pasta and sauce components.
🍳 Step 2: Cook Pasta and Combine with Sauce
Return the skillet to medium heat and add the 12 oz elbow macaroni along with the 2 cups canned tomato sauce, 1.5 teaspoons salt, and 0.5 teaspoon ground black pepper. Stir well to coat the pasta evenly in the sauce. The pasta will absorb the sauce as it cooks.
Bring the mixture to a gentle boil, then reduce heat to medium-low and simmer uncovered for 8-10 minutes, stirring occasionally. You're looking for the pasta to become tender but still hold some bite—this ensures it finishes cooking in the oven. The sauce should be thick enough to cling to the pasta strands.
🥘 Step 3: Layer Cheese and Top with Creamy Mixture
Remove the skillet from heat and spread the cooked pasta mixture evenly in the pan. Sprinkle 2 cups shredded mozzarella cheese and 0.5 cup grated parmesan cheese evenly over the top. The cheese should melt into a golden blanket when baked.
In a small bowl, whisk together the 0.25 cup heavy cream and 1 teaspoon italian seasoning. Pour this creamy mixture evenly over the cheese layer. The cream will create a rich, velvety sauce that binds everything together beautifully.
🔥 Step 4: Bake Until Bubbly and Golden
Transfer the skillet to a preheated 375°F oven and bake for 15 minutes. The cheese should begin bubbling vigorously around the edges—this is your visual cue that it's melting perfectly. After 15 minutes, sprinkle the 0.25 cup breadcrumbs evenly over the top.
Return to the oven and bake for another 5-7 minutes until the breadcrumbs turn golden brown and the cheese is fully melted and bubbly. The breadcrumbs add wonderful texture contrast to the creamy sauce. Let the macaroni rest in the pan for 5 minutes before serving to allow the cheese to set slightly.
🍽️ Step 5: Broil for Extra Crispiness (Optional)
For maximum browning, transfer the skillet to the broiler for 1-2 minutes until the top turns deep golden brown. Watch carefully to prevent burning—you want crispy breadcrumbs, not charred cheese. The broiler adds that restaurant-quality finish that makes this dish truly special.
Serve immediately with a sprinkle of extra grated parmesan cheese and a fresh salad. The combination of creamy pasta, rich tomato sauce, and crispy breadcrumb topping creates the ultimate comfort dish that's perfect for any weeknight.
Pro Tips For Making Baked Macaroni Red Sauce
- Pre-Cook the Pasta: Drain the elbow macaroni al dente—about 1 minute less than package instructions—and rinse it under cold water. This prevents mushiness when baking and keeps the sauce from turning into a soggy glaze. (Yes, even if you’re impatient like me.)
- Sauté Onion-Garlic Slow: Cook the onions and garlic in the saucepan low and steady until the onions are translucent and garlic just smells heavenly—no browning. Burnt garlic ruins the whole dish, and rushed cooking makes the sauce taste raw. Take your time here.
- Deglaze with a Splash: After browning the onions (if you do), add a splash of water or pasta water to the pan before pouring in the canned tomato sauce. This lifts stuck-on bits and gives the sauce a deeper, richer base right from the start.
- Bake Covered First: Start the macaroni in the oven with the lid on for the first 15 minutes. This lets the sauce cling to the pasta without drying out—no peeking! Then uncover to crisp the top if you like it golden. (Your future self will thank you.)
Dietary considerations for this recipe
Gluten-Free Swaps
Replace elbow macaroni with gluten-free pasta like Barilla GF or Jovial—both hold up well in baking. For extra texture, try chickpea or lentil-based pasta (like Banza), which adds plant-based protein. Just reduce baking time by 2-3 minutes since GF pasta cooks faster.
To thicken the sauce without gluten, mix 1 tbsp cornstarch with 2 tbsp water> and stir into the tomato sauce before baking. This prevents a watery texture while keeping the dish cohesive. 🌱
Dairy-Free Options
Swap mozzarella for dairy-free shreds> (like Violife or Daiya) and use nutritional yeast> instead of parmesan for a cheesy, umami kick. For creaminess, blend ½ cup cashew cream> (soaked cashews blended with water) with the Italian seasoning.
Melted dairy-free butter> (like Earth Balance) works perfectly for sautéing onions and garlic. Just ensure your breadcrumbs are certified dairy-free to avoid cross-contamination. The texture stays rich and satisfying!
Lower-Carb Adaptations
Cut carbs by using cauliflower rice> (2 cups) mixed with ½ cup cooked quinoa> to replace pasta. Sauté with onions and garlic, then proceed with the red sauce layer. Reduce baking time to 12 minutes>—cauliflower dries out faster.
For a keto twist, skip breadcrumbs and top with crushed pork rinds> (2 tbsp) for crunch. Add 1 tbsp cream cheese> to the sauce for extra richness. This version keeps net carbs under 10g per serving> while delivering all the comfort!
Vegetarian Protein Boost
Add ½ cup cooked lentils> or white beans> to the pasta mixture for extra protein. Drain and rinse canned beans first to avoid a mushy texture. Stir them in during the 8-10 minute simmer> for even heating.
For a meaty flavor, sprinkle 1 tbsp nutritional yeast> and ½ tsp smoked paprika> over the cheese layer. The combination adds depth without animal products. Perfect for veggie-lovers who still crave hearty texture!
Nutrition facts
Frequently asked questions
Can I use any pasta shape for this baked macaroni recipe?
Elbow macaroni works best because its shape holds the sauce and cheese beautifully, but you can use penne, rigatoni, or cavatappi too. Avoid long, thin noodles like spaghetti—they'll overcook and get mushy in the oven. If using a different shape, reduce baking time by 2-3 minutes since some shapes cook faster.
Why does my cheese sauce look watery after baking?
Watery sauce usually means the pasta wasn't fully cooked before baking or the sauce was too thin. Next time, simmer the pasta until it's al dente (about 8-10 minutes) and reduce the sauce on the stovetop until it thickens slightly before baking. For extra insurance, stir in 1 tablespoon cornstarch mixed with 2 tablespoons water during the stovetop cooking.
How do I make this dish ahead of time?
Assemble everything in the baking dish, cover tightly with foil, and refrigerate for up to 24 hours. When ready to bake, add 10 extra minutes to the cooking time since it starts cold. For freezer meals, bake as directed, let cool completely, then store in airtight containers for up to 3 months. Reheat in the oven at 350°F for 15 minutes covered with foil.
Can I add meat or other veggies to this recipe?
Brown ½ pound ground beef or Italian sausage with the onions for extra protein, or stir in 1 cup diced bell peppers and mushrooms during the stovetop cooking. For a vegetarian option, add ½ cup cooked lentils or spinach—just reduce the baking time by 2-3 minutes since veggies release moisture.
What's the secret to getting a crispy cheese topping?
The breadcrumbs are your secret weapon! Use panko for maximum crunch, and make sure they're evenly distributed over the cheese. Broil for 1-2 minutes at the end for extra browning, but watch closely—it burns fast! For even crispier results, sprinkle a pinch of garlic powder on the breadcrumbs before baking.